How can a conda environment be activated in docker or singularity containers?
The conda documentation says that: Activating environments is essential to making the software in the environments work well. Activation entails two primary functions: adding entries to PATH for the environment and running any activation scripts that the environment may contain. These activation scripts are how packages can set arbitrary environment variables that may be necessary for their operation. Therefore, it is important to launch the command conda activate myTool_env.
This section describes how to activate a conda environment inside a container. First some basics about shells are details to better understand how to write the docker and singularity recipes.
Properties of shells
Before going any further, it is important to remind the basics of shell configurations and list of files it reads at start-up. In this section, we copy-pasted Holger’s Notes.
Type of shells
There are two properties that each shell has:
it is either a login or a non-login shell
and as well as an interactive or non-interactive shell.
Login shells
A login shell is typically started when logging into a computer. In it, certain startup scripts are sourced that can be used to set the initial values for environment variables (e.g. PATH). A new bash shell can be explicitly turned into a login shell by using the -l or --login options.
Interactive shells
An interactive shell is a shell that has its input, output and error streams connected to a terminal. This is typically the case when you start a shell inside another shell or when starting a shell in a docker container. The typical case of a non-interactive shell is a shell that is started in order to run a script. The option -i can be used to explicitly turn a shell into an interactive shell.
In addition to these option there are other switches that can be used to customize the behavior which startup scripts get run and we will go over them and their effects later.
Configuration files
There are a number of different configuration files that are sourced in different situations. Here is an overview of the ones relevant for bash:
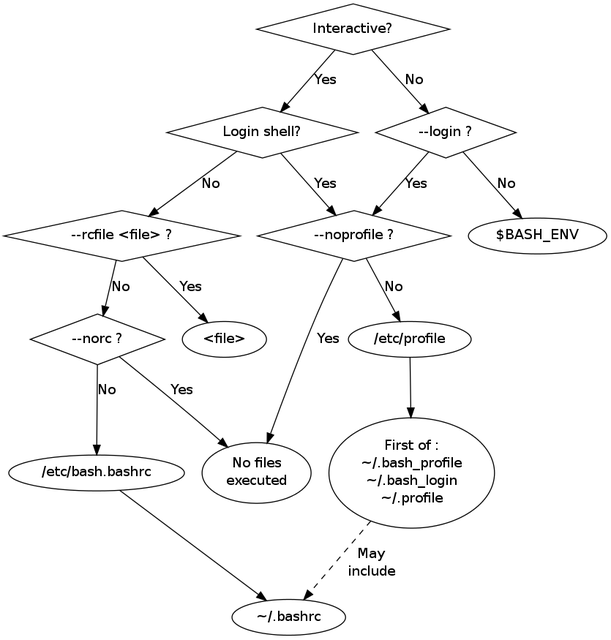
/etc/profile: This system-wide script is sourced by login shells at startup before any other files are sourced/etc/profile.d: A system-wide directory from which additional scripts are sourced by login shells. While not formally listed in the GNU manual linked above, most distributions also read all scripts in this directory.~/.bash_profile,~/.bash_login,~/.profile: These are scripts for individual users that are read by login shells. Only the first of these scripts that exists and is readable is used. If the option--noprofileis used, none of these scripts is sourced./etc/bashrcor/etc/bash.bashrc: A system-wide script that is sourced by interactive shells. CentOS uses/etc/bashrcwhereas Debian-based systems use/etc/bash.bashrc.~/.bashrc: This user-specific script is sourced for all interactive shells. If the option--norcis used, this file is not being sourced. If the option--rcfilefile is being used, file is sourced instead of~/.bashrc.$BASH_ENV: If a non-interactive shell is started and the environment variableBASH_ENVexists, then the script file referenced inBASH_ENVwill be sourced.
The workflow is summarized in this image:
Singularity
It is important to remind the behavior of singularity:
singularity launches any
bashwith the--norcoption. Fromman bash, this option means: “Do not read and execute the system wide initialization file/etc/bash.bashrcand the personal initialization file~/.bashrcif the shell is interactive”. Note that this default behavior of singularity can be changed if theSINGULARITY_SHELLenvironment variable is set to/bin/bash(but this is no recommended).Inside the
%postsection any file referred to as~/fileNameor${HOME}/fileNameis in/rootinside the container as it is built with root privilege. This means that a standard user who launches a singularity image can never access such files. Therefore, if they are really needed by a standard user, they must be available elsewhere inside the image.All the command lines in the section
%environmentin the Definition file are written in the file/.singularity.d/env/90-environment.shinside the singularity image. This file is execute at startup by singularity.
Example1: impossible to activate the conda environment at startup
Let’s consider you run singularity build myTool.sif myTool.def from this myTool.def Definition file:
Bootstrap: docker
From: 4geniac/almalinux:9.5_conda-py312_25.1.1-2

%environment
    export LC_ALL=en_US.utf-8
    export LANG=en_US.utf-8

%post
    mkdir -p /opt/etc
    yum install -y which \
    && yum clean all \
    && conda create -y -n myTool_env  \
    && echo -e "#! /bin/bash\n\n# script to activate the conda environment" > ~/.bashrc \
    && conda init bash \
    && echo -e "\nconda activate myTool_env" >> ~/.bashrc \
    && echo "echo \"Hello World\"" >>  ~/.bashrc \
    && conda clean -a \
    && cp ~/.bashrc /opt/etc/bashrc
This way, the conda environment myTool_env is not activated at startup. Indeed, the file ~/.bashrc will never be read by standard user and nothing says what to do with the file /opt/etc/bashrc. In order to activate it, you explicitly need to type the command source /opt/etc/bashrc:
singularity  shell myTool.sif
Singularity> conda env list
base                  *  /usr/local
myTool_env               /usr/local/envs/myTool_env

Singularity> source /opt/etc/bashrc
Hello World
(myTool_env) Singularity> conda env list
base                     /usr/local
myTool_env            *  /usr/local/envs/myTool_env

(myTool_env) Singularity>
The behavior and outputs are the same if you run the following commands (note that the /bin/bash -c passed to singularity makes the shell non-interactive):
singularity  exec myTool.sif /bin/bash -c 'conda env list; source /opt/etc/bashrc; conda env list'
singularity  run myTool.sif /bin/bash -c 'conda env list; source /opt/etc/bashrc; conda env list'
Example2: activate the conda environment at startup with ‘singularity exec’ or ‘run’
From the Definition file used in Example1: impossible to activate the conda environment at startup, add export BASH_ENV=/opt/etc/bashrc in the section %environment. The myTool.def Definition file is now:
Bootstrap: docker
From: 4geniac/almalinux:9.5_conda-py312_25.1.1-2

%environment
    export LC_ALL=en_US.utf-8
    export LANG=en_US.utf-8
    export BASH_ENV=/opt/etc/bashrc

%post
    mkdir -p /opt/etc
    yum install -y which \
    && yum clean all \
    && conda create -y -n myTool_env  \
    && echo -e "#! /bin/bash\n\n# script to activate the conda environment" > ~/.bashrc \
    && conda init bash \
    && echo -e "\nconda activate myTool_env" >> ~/.bashrc \
    && echo "echo \"Hello World\"" >>  ~/.bashrc \
    && conda clean -a \
    && cp ~/.bashrc /opt/etc/bashrc
Using singularity exec or singularity run activate the conda environment myTool_env because they launch non-interactive shells which read and execute the file from the BASH_ENV environment variable:
singularity  exec myTool.sif /bin/bash -c 'conda env list'
Hello World
base                     /usr/local
myTool_env            *  /usr/local/envs/myTool_env

singularity  exec myTool.sif /bin/bash -c 'conda env list'
Hello World
base                     /usr/local
myTool_env            *  /usr/local/envs/myTool_env
However, singularity shell launch an interactive shell thus ignoring the BASH_ENV environment variable. The conda environment myTool_env is therefore not activated:
singularity  shell myTool.sif
Singularity> conda env list
base                  *  /usr/local
myTool_env               /usr/local/envs/myTool_env

Singularity> source /opt/etc/bashrc
Hello World
(myTool_env) Singularity> conda env list
base                     /usr/local
myTool_env            *  /usr/local/envs/myTool_env

(myTool_env) Singularity>
Example3: activation of the conda environment
From the Definition file used in Example1: impossible to activate the conda environment at startup, add source /opt/etc/bashrc in the section %environment. The myTool.def Definition file is now:
Bootstrap: docker
From: 4geniac/almalinux:9.5_conda-py312_25.1.1-2

%environment
    export LC_ALL=en_US.utf-8
    export LANG=en_US.utf-8
    source /opt/etc/bashrc

%post
    mkdir -p /opt/etc
    yum install -y which \
    && yum clean all \
    && conda create -y -n myTool_env  \
    && echo -e "#! /bin/bash\n\n# script to activate the conda environment" > ~/.bashrc \
    && conda init bash \
    && echo -e "\nconda activate myTool_env" >> ~/.bashrc \
    && echo "echo \"Hello World\"" >>  ~/.bashrc \
    && conda clean -a \
    && cp ~/.bashrc /opt/etc/bashrc
As the section %environment is copied inside the singularity image in the file, and since this file is executed by singularity anytime a shell is started, the conda environment myTool_env is thus activated by default at singularity startup:
singularity shell myTool.sif
Hello World
Singularity myTool.sif:~> conda env list
base                     /usr/local
myTool_env            *  /usr/local/envs/myTool_env

Singularity myTool.sif:~>
singularity  run  myTool.sif /bin/bash -c 'conda env list'
singularity  exec  myTool.sif /bin/bash -c 'conda env list'
Hello World
base                     /usr/local
myTool_env            *  /usr/local/envs/myTool_env
singularity  exec  myTool.sif /bin/bash -c 'conda env list'
Hello World
base                     /usr/local
myTool_env            *  /usr/local/envs/myTool_env
Docker
It is important to remind the behavior of Docker:
Docker is run with root privilege. All the files created inside the container such as
~/fileNameor${HOME}/fileNameare in/rootinside the container. These files will be available when the container is run.
Example1
Let’s consider you run sudo docker build -f myToolV0.Dockerfile -t mytool . from this myTool.Dockerfile:
FROM 4geniac/almalinux:9.5_conda-py312_25.1.1-2

# install conda env
RUN yum install -y which \
&& yum clean all \
&& conda create -y -n myTool_env  \
&& echo -e "#! /bin/bash\n\n# script to activate the conda environment" > ~/.bashrc \
&& conda init bash \
&& echo -e "\nconda activate myTool_env" >> ~/.bashrc \
&& echo "echo \"Hello World\"" >>  ~/.bashrc \
&& conda clean -a

# environment variables
ENV LC_ALL en_US.utf-8
ENV LANG en_US.utf-8
ENV BASH_ENV ~/.bashrc
The following docker run options will start an interactive shell, the root user will have access to the ~/.bashrc file inside the container, this file will be sourced by the shell. Therefore, the conda environment myTool_env is activated:
sudo docker run -it mytool
Hello World
(myTool_env) bash-4.2# conda env list
base                     /usr/local
myTool_env            *  /usr/local/envs/myTool_env
However, if docker run uses the following options, it will start an non-interactive shell. Therefore, the ~/.bashrc is not sourced and the conda environment myTool_env is not activated:
sudo docker run -i  --entrypoint /bin/bash mytool -c 'eval conda env list'
base                  *  /usr/local
myTool_env               /usr/local/envs/myTool_env
Example2
Let’s add ENV BASH_ENV ~/.bashrc in the Dockerfile and set the PS1 variable (otherwise the shell will complain about unbound variable) as follows:
FROM 4geniac/almalinux:9.5_conda-py312_25.1.1-2

# install conda env
RUN yum install -y which \
&& yum clean all \
&& conda create -y -n myTool_env  \
&& echo -e "#! /bin/bash\n\n# script to activate the conda environment" > ~/.bashrc \
&& echo "export PS1='Docker> '" >> ~/.bashrc \
&& conda init bash \
&& echo -e "\nconda activate myTool_env" >> ~/.bashrc \
&& echo "echo \"Hello World\"" >>  ~/.bashrc \
&& conda clean -a

# environment variables
ENV LC_ALL en_US.utf-8
ENV LANG en_US.utf-8
ENV BASH_ENV ~/.bashrc
sudo docker run -i  --entrypoint /bin/bash mytool -c 'eval conda env list'
base                     /usr/local
myTool_env            *  /usr/local/envs/myTool_env
Application to nextflow
When running inside singularity, nextflow uses a command line similar to:
singularity exec myTool.sif /bin/bash -c 'conda env list'
Therefore, the Definition file must be written as explained in:
Example2: activate the conda environment at startup with ‘singularity exec’ or ‘run’, or
Example3: activation of the conda environment if the conda environment
myTool_envmust be also activated by default withsingularity shell(we recommend this solution).
When running inside docker, nextflow uses a command line similar to:
sudo docker run -i --entrypoint /bin/bash mytool -c 'eval conda env list'
Therefore, the Dockerfile must be written as explained in Example2.